Pinterest is a social media platform that has been growing in popularity over the past few years. It’s a place where you can find and share pictures of what you love. In order to make the most out of Pinterest, it’s important that your website or blog is claim your website on Pinterest so that people can find you there.
According to Statista of 2022, Pinterest has more than 433 million monthly active users (MAUs) worldwide.
Pinterest is a new but very innovative and engaging social platform for driving traffic to your blog or website. Additionally, claiming your website on Pinterest allows for access to beneficial business features.
Why Would I Want to Claim My Website on Pinterest?
Pinterest is an online platform that has become a must-have for many businesses. It is a great way to market your brand and connect with your audience.
The benefits of claiming your website on Pinterest include:
- Increased traffic to your website
- More social media engagement
- More exposure
- Better visibility on the platform
- Enable rich pins for your account
There are many more reasons why you should claim your site on Pinterest. The most obvious reason is that you can increase your traffic and sales through this social media platform. Another reason would be that you can reach out to more people with just one click of a button.
You can also enable the rich pins to feature to add more information and a CTA (call to action) to your pins.
Additionally, you can easily login to Pinterest Analytics, where you will be able to track and monitor your performance. This is essential for growing your blog traffic on the platform.
How to Claim Your Website on Pinterest
Now, You’ve learned why you should claim your website on Pinterest, it’s time you learned how to claim your website on pinterest account. One important thing to note is that you need a Pinterest Business Account in order to verify your websites.
The claiming your website on Pinterest is simple, but it’s not like the other social media, where you can simply copy and paste your website URL on your profile.
Assuming that if you have created Pintersted business account and a website (on WordPress), Then you can follow these steps to claim your website on pinterest:
1. Log into your Pinterest Business Account
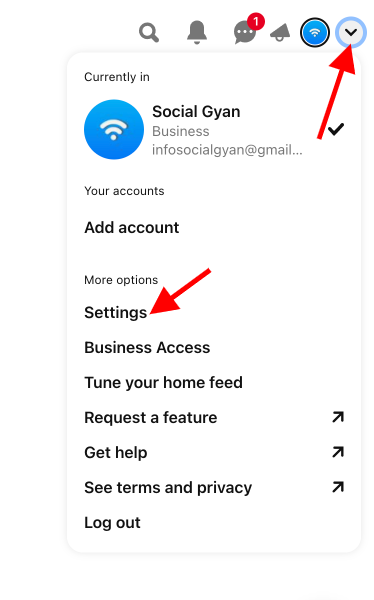
Log into your Pinterest Business Account on your PC browser and click on the drop-down menu located at the top right-hand corner. Then select settings.
2. Navigate to your Claim settings
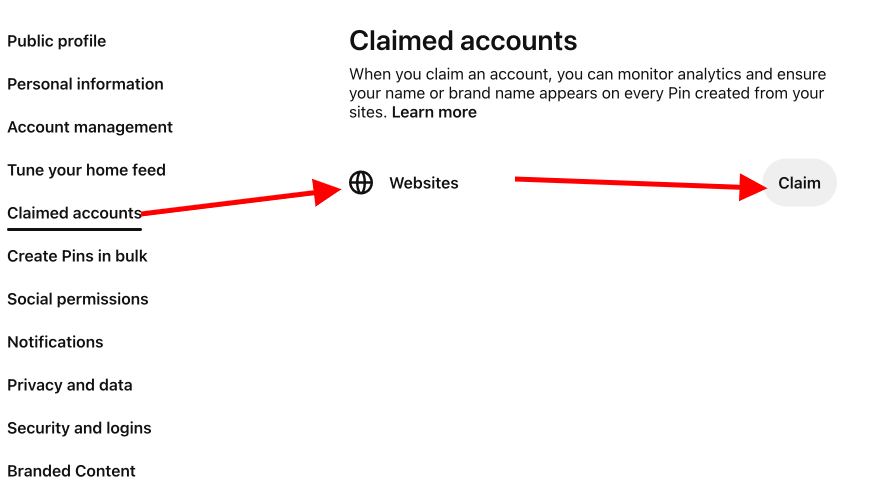
Next, Click on claimed account settings on the left-hand side navigation bar. Since you’re claiming your website, enter your website url, and click on the grey Claim button on the right.
3. Choose your Claiming method
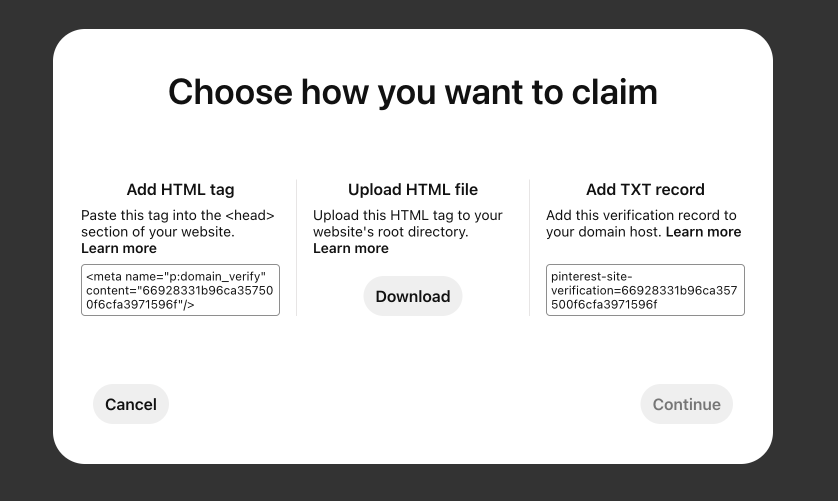
After clicking on “Claim Website”, You will see a pop-up at middle of the screen with three different options for claiming your website:
- Add HTML tag
- Upload HTML file
- Add TXT record
It may sound a little confusing at first, but this will be very easy.
We are going to use the HTML tag method to claiming our website.
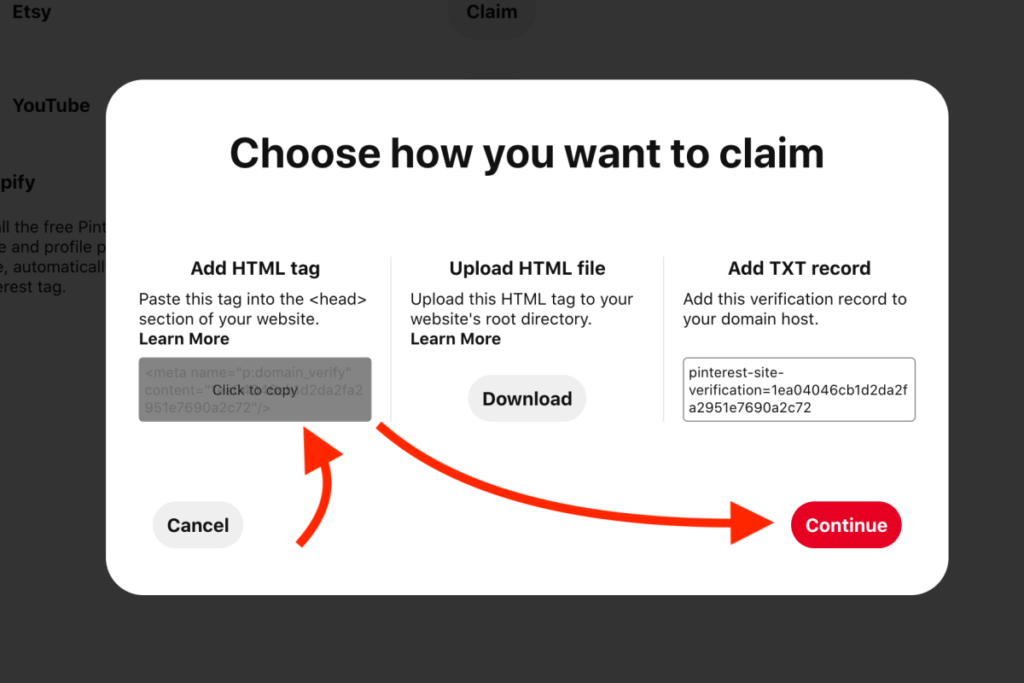
Just hover your mouse above the text field and click on it to copy the meta tag and then “continue“.
Next you will be able to enter your website URL, then we’ll come back to verify this on our end.
4. Paste Your Meta Tag into Yoast SEO or Head Section
After you copy your meta tag and open a new browser tab on your desktop, and log into your WordPress dashboard.
You have to install and activated the Yoast SEO plugin. Then Paste the copied meta tag into “Pinterest confirmation” field navigate to Yoast SEO > Social > Pinterest.
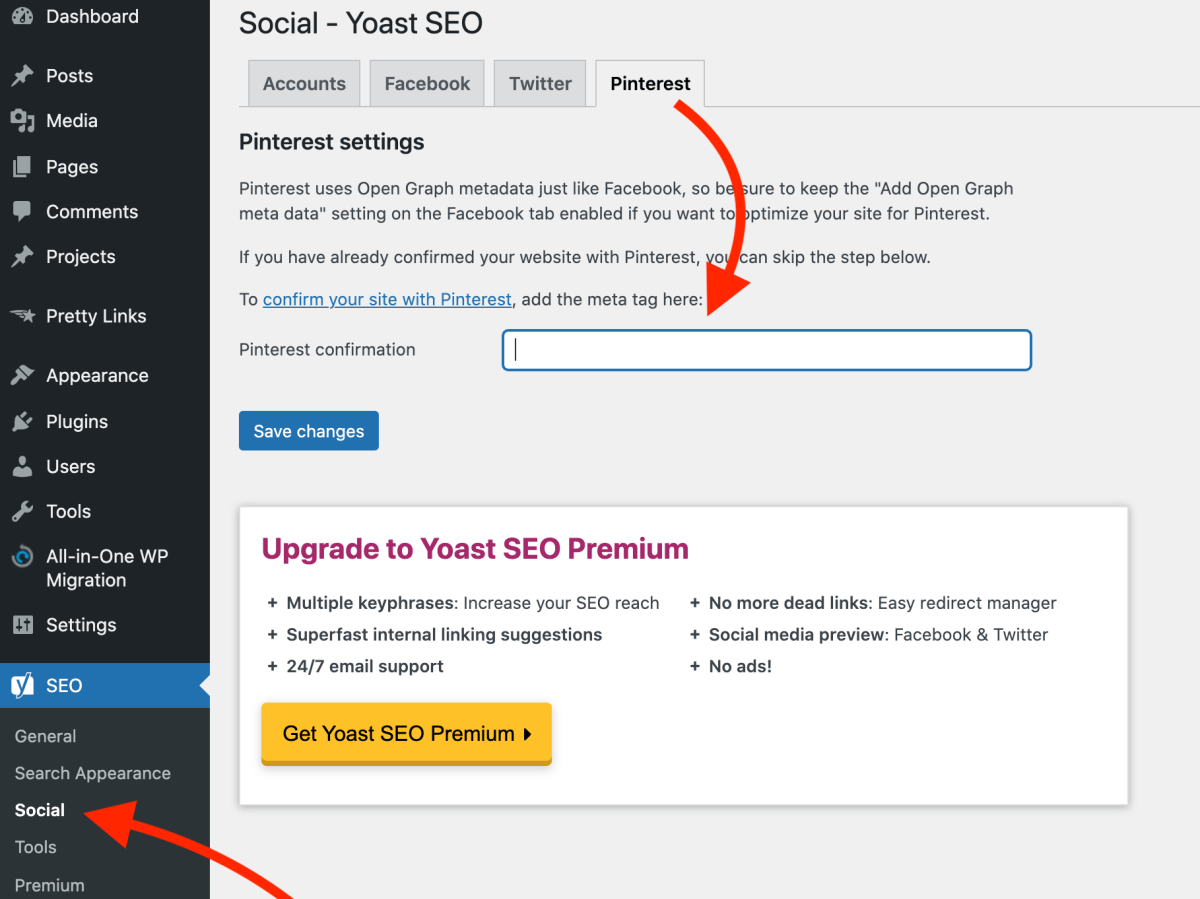
Then, click Save changes.
You perform the same step with any other SEO plugins (RankMath, AIO, etc) or any Other Header footer plugin to Verify you, Tag, to Pinterest.
If you don’t want to install any Plugins or you have an HTML website, Go to the index.html file of your website and add the tag to the <head> section before the <body> section. The instructions for this depend on what site your website is hosted on. In WordPress, you find the head section in Appearance> Theme Editor.
Please note: You may notice that the meta tag looks a little different now than when you pasted it in. It’s okay. This is because Meta keywords are case sensitive and must be entered exactly as you see them here.
5. Verify your Claimed Website on Pinterest
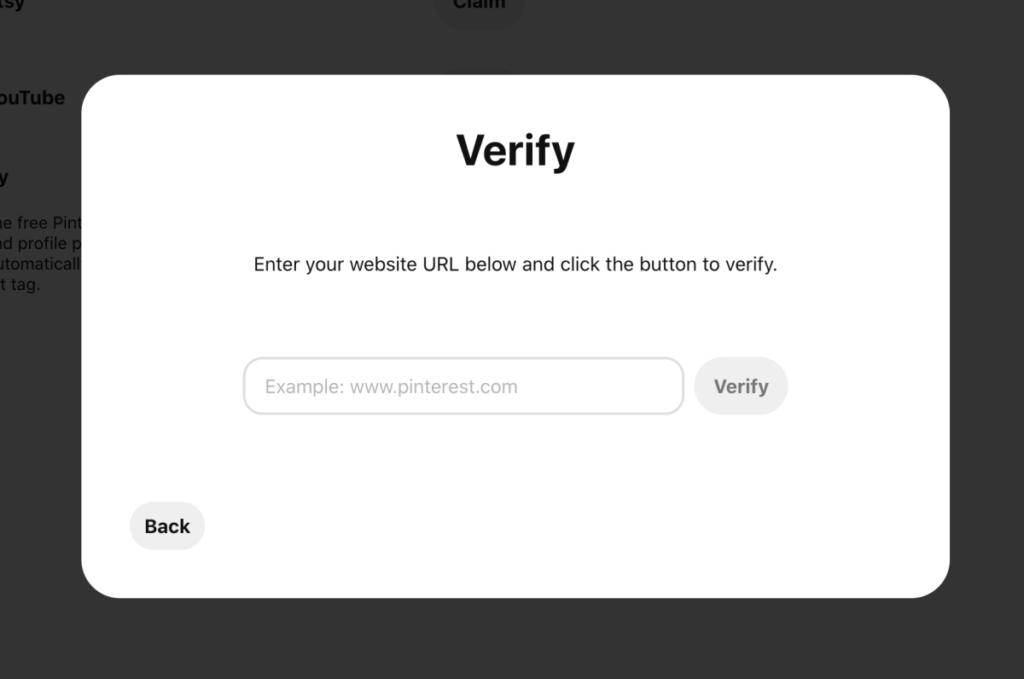
At last, Go back to Pinterest. You should still see the “Verify” window there.
Click the verification field and enter your website URL or domain name to verify this account or claim your website on Pinterest.
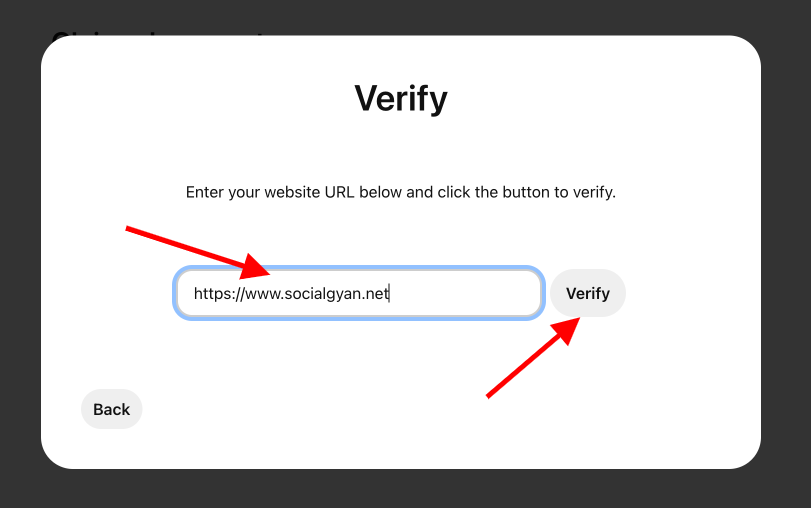
Pinterest will now check whether your HTML meta-tag is readable by the web browser or not.
Once you’re done with the claims process, you’ll get a confirmation email from Pinterest saying that your website has now been claimed.
If you run into any problems with the verification process, go check out this article on Pinterest. Feel free to share your thoughts in the comments and I’ll do my best to help you personally.
How to Unclaim Your Website on Pinterest Properly
Unclaiming your website on Pinterest is a bit confusing. When you unclaim your website in account settings, the claimed website disappears and it gives a message that my website has been successfully unclaimed.
This often happens when you sign out and then sign back in. The site still says that the website is claimed. So whenever you try to unclaim it, it keeps happening and won’t let you unclaim it or change your website.
Unclaiming your website on Pinterest is a process that can take a few minutes. You simply need to click on the “unclaim” button and come back to the site you were originally trying to claim.
There are some steps you should follow in order to unclaim your website, but it’s not hard at all. Here are the steps for you:
I was having the same problem and finally figured out how to fix it. I was not able to unclaim the website on a laptop. I tried everything. To unclaim the website you must do these next steps on your phone or tablet (something mobile) or it won’t work.
- log in to Pinterest on a tablet or your phone – (to the account that you want to remove the website from)
- Go to Settings
- Select Edit Profile
- Scroll to the bottom where it shows the “Website” field
- Tap in the field and delete/backspace the entire website and click save. (you cannot delete the website from this field on a laptop/desktop. It’s grayed out).
Next go back to your laptop/desktop and login to the same pinterest that you just changed.
- Go to Settings > Claimed Website
- Double check the website is no longer listed.
- Now login to the Pinterest account that you want the website to be linked to
- Go to Settings – Claimed Website
- Follow the steps to claim the website on Pinterest as explained above. Settings> Claimed accounts> Claim> Add HTML tag> Continue> Verify.
Hopefully, This works for you as well.
FAQ: Claiming a website on Pinterest
When you claim a website on Pinterest, you’re telling the site that it’s worth following. You’re also telling the site that you might like their content and want to see more of it in your feed. Claiming a website on Pinterest is an easy way to get traffic to your website or blog.
Yes, you should definitely claim the website on Pinterest. This gives you access to helpful and valuable analytics, statistics, metrics, and tools that help you grow your blog traffic.
The simple way to claim a website on Pinterest is by using the free Yoast SEO WordPress plugin on WordPress. Go to Yoast SEO > Social > Pinterest and paste your HTML tag into the “Pinterest confirmation” field. Next, click Save changes to claim your website.
Login to Pinterest on a tablet or phone (to the account that you want to remove the website from). Remove the website by going to Edit Profile. Then, go back to your laptop/desktop and login to the same Pinterest account. Now you can change the claimed URL.
Sometimes, if you change the website URL or domain name of your business, you should unclaim the old website before claiming a new website.
Video: How to claim a website on Pinterest
Conclusion
This tutorial will teach how to claim your website on Pinterest from the very basics of how to create a Pinterest profile to links you should include in your profile to optimizing it for traffic.
If you have any questions or concerns, please leave them in the comments. We’re happy to help!
Claiming your website on Pinterest is an essential part of building a strong Pinterest marketing strategy for your website. It provides you with a chance to build up engagement, promote your content, and expand your reach across the platform.
So you just linked your business website to Pinterest, and now you can access lots of cool tools like analytics and tools that help you generate more visibility.
Should you want to know more? get in touch with our experts and subscribe to us for the weekly newsletter. We’ll take it from there.







How to Get Fake Followers on Instagram
How To Get Followers On Instagram for Free
How To Keep Your Facebook Story Longer For 3 Days
How to Fix GIF Not Working on Instagram
How to Fix “Your Account Has Been Temporarily Locked” on Instagram
How to Get More Views on Snapchat: Tips for Increasing Your Audience
How To Recover Deleted Messages on Messenger
Best time to Post on Social Media in India